Intonator: Sentimental Analysis Flask App
Intonator intonate tone of text with the help of machine learning model trained using Support vector machines classification and Natural language processing methods. Using Flask library to wrap the model into a web app.
In linguistics, intonation is variation in spoken pitch when used, for distinguishing a range of functions such as indicating the attitudes, emotions and sentiment of the speaker, focusing on important elements and features of the message. With this definition, we strive to make an application determined to achieve the capability to intonate, hence, begins the development of Intonator.
The development process of Intonator are:
- Text data preprocessing,
- Machine learning model creation and
- Application deployment.
Natural Language Processing
Natural language processing (NLP) refers to the branch of computer science and more specifically, the branch of artificial intelligence or AI, concerned with giving computers the ability to understand text and spoken words in much the same way human beings can. Natural language processing applications are very wide used. Examples of products or services that utilizes NLP are autocorrect, language translator, social media monitoring system, and many more! Any product that involves human language(natural language) and computer, is going to need to Implement NLP at some point in the development stage.
Why NLP?
It might not seems like it but human languages are astoundingly complex and with a high degree of diversity especially to the computers. There are hundreds of languages and dialects, but within each language is a unique set of grammar and syntax rules, terms and slangs. NLP is important because it could help resolving the ambiguity in language and add useful numeric structure to the data for many downstream applications, such as speech recognition or text analytics. NLP combines computational linguistics rule-based modeling of human language with statistical, machine learning, and deep learning models. Together, these technologies enable computers to process human language in the form of text or voice data and to ‘understand’ its full meaning, complete with the speaker or writer’s intent and sentiment.
How do we implement NLP?
We are taking a full advantage of a library called Natural Language Toolkit, aka, NLTK. NLTK includes libraries for many of the NLP tasks, these are the libraries there were utilized in our program to their full potential.
However, before we get started on NLP Implementation, we first have to clean and prepare our data. This procedure on this process could be vary depending on what type of dataset you are using.
We are using “tweets” from Twitter to train and test model. First step of our cleaning data process is to convert all tweets into lowercase characters. This is actually is common technique no matter which dataset you are using if you’re working on an NLP project. Second, remove any URLs from our data. Last but not least, is to remove handles, punctuation, extra spaces, numbers and special characters. All these steps are to remove unnecessary special characters, those are useless to our process.
# NLTK
import nltk

from nltk.corpus import twitter_samples
from nltk.corpus import stopwords
from nltk.corpus import wordnet

from nltk.stem import WordNetLemmatizer
from nltk.tokenize import word_tokenize

nltk.download('all') # Overkill but hehe

# Sci-kit Learn
from sklearn import datasets, svm, metrics, tree

from sklearn.model_selection import train_test_split
from sklearn.model_selection import cross_val_score
from sklearn.model_selection import KFold

from sklearn.feature_extraction.text import CountVectorizer
from sklearn.metrics import accuracy_score, classification_report, confusion_matrix

from sklearn.naive_bayes import GaussianNB
from sklearn.neighbors import KNeighborsClassifier

# Utilities
import re
import string
import numpy as np
import pandas as pd
import matplotlib.pyplot as plt
More details on modules and Library:
- Feature Extraction: https://scikit-learn.org/stable/modules/feature_extraction.html
- Metric and Scoring: https://scikit-learn.org/stable/modules/model_evaluation.html
- Panda DataFrame: https://pandas.pydata.org/docs/reference/api/pandas.DataFrame.html
- RegEx: https://medium.com/factory-mind/regex-tutorial-a-simple-cheatsheet-by-examples-649dc1c3f285
- String: https://www.journaldev.com/23788/python-string-module
Now on to NLP, first , Tokenization, breaking phrases, sentences, paragraphs and passages into tokens that helps the computer understand the text better. Picture shown above is presenting Tokenization process. Now, removing stop words process. Stop words are the most common words in any language, and does not contain or add much information to the text. So, we remove them to maximize the performance and efficiency. Examples of stop words are, “the”, “for”, “to”, and etc.
# Prepare Data

# impor sample tweets
positive_tweets = twitter_samples.strings('positive_tweets.json')
negative_tweets = twitter_samples.strings('negative_tweets.json')

# Create a dataframe from positive tweets
df = pd.DataFrame(positive_tweets, columns=['Tweet'])

# Add a column to dataframe for positive sentiment value 1
df['Sentiment'] = 1

# Create a temporary dataframe for negative tweets
temp_df = pd.DataFrame(negative_tweets, columns=['Tweet'])

# Add a column to temporary dataframe for negative sentiment value 0
temp_df['Sentiment'] = 0

# Combine positive and negative tweets in one single dataframe
df = df.append(temp_df, ignore_index=True)
df = df.sample(frac = 1)
df.reset_index(drop=True, inplace=True)
# Clean Data

# Converting all tweets to lowercase
def convert_to_lowercase(tweet):
    return tweet.lower()

df['Tweet'] = df['Tweet'].apply(lambda x: convert_to_lowercase(x))

# Removing any urls from tweets
def remove_urls(tweet):
    tweet = re.sub('http[s]?://(?:[a-zA-Z]|[0–9]|[$-_@.&+#]|[!*\(\),]|'\
    '(?:%[0–9a-fA-F][0–9a-fA-F]))+','', tweet)
    return tweet

df['tweet_no_urls'] = df['Tweet'].apply(lambda x: remove_urls(x))

# Removing twitter handles, punctuation, extra spaces, numbers and special characters
def remove_noise(tweet):
    tweet = re.sub("(@[A-Za-z0–9_]+)","", tweet)
    tweet = "".join([char if char not in string.punctuation else " " for char in tweet])
    tweet = re.sub(' +', ' ', tweet)
    tweet = re.sub("[0–9]+", "", tweet)
    tweet = re.sub("[^A-Za-z0–9_. ]+","",tweet)
    return tweet

df['cleaned_tweet'] = df['tweet_no_urls'].apply(lambda x: remove_noise(x))
Stemming and Lemmatization are methods of trimming words down to their roots.
# Apply NLP Techniques

# Loading stop words and removing negative stop words from the list
stop_words = stopwords.words('english')
words_to_keep = ['don', 'don’t', 'ain', 'aren', "aren’t", 'couldn', "couldn’t", 'didn', "didn’t", 'doesn', "doesn’t", 'hadn', "hadn’t", 'hasn', "hasn’t", 'haven', "haven’t", 'isn', "isn’t", 'ma', 'mightn', "mightn’t", 'mustn', "mustn’t", 'needn', "needn’t", 'shan', "shan’t", 'no', 'nor', 'not', 'shouldn', "shouldn’t", 'wasn', "wasn’t", 'weren', "weren’t", 'won', "won’t", 'wouldn', "wouldn’t"]
my_stop_words = stop_words

# Removing stop words from the tweet
def remove_stop_words(tweet):
    tokens = word_tokenize(tweet)
    tweet_with_no_stop_words = [token for token in tokens if not token in my_stop_words]
    reformed_tweet = ' '.join(tweet_with_no_stop_words)
    return reformed_tweet

df['tweet_no_stop'] = df['cleaned_tweet'].apply(lambda x: remove_stop_words(x))

# Lemmatize with POS Tag
def get_wordnet_pos(word):
    """Map POS tag to first character lemmatize() accepts"""
    tag = nltk.pos_tag([word])[0][1][0].upper()
    tag_dict = {"J": wordnet.ADJ,
    "N": wordnet.NOUN,
    "V": wordnet.VERB,
    "R": wordnet.ADV}
    return tag_dict.get(tag, wordnet.NOUN)

# Lemmatization
lemmatizer = WordNetLemmatizer()

def lemmatize_sentence(tweet):
    token_words = word_tokenize(tweet)
    lemmatized_tweet = []
    for word in token_words:
        lemmatized_tweet.append(lemmatizer.lemmatize(word, get_wordnet_pos(word)))
        lemmatized_tweet.append(" ")
    return "".join(lemmatized_tweet)

df['lemmatized_text'] = df['tweet_no_stop'].apply(lambda x: lemmatize_sentence(x))
NLTK also includes libraries for implementing capabilities such as semantic reasoning, the ability to reach logical conclusions based on facts extracted from text. NLTK toolkit is “heart and soul” of our project/program. This toolkit is the foundation of our project, it helped us to a great deal especially when we were in the early development stage.
Model Training
After the word preprocessing methods of NLP, our cleaned text can now be use to train our model which we will be using in the application. We approach the problem of training our model by using the Scikit-Learn library.
Sci-Kit Learn
In which firstly, we utilize the function of CountVectorizer, which converts the cleaned text to a matrix of token counts, and can be fit to create feature count.
count_vectorizer = CountVectorizer(max_features=1000, min_df=8)
feature_vector = count_vectorizer.fit(df['lemmatized_text'])

# To get a list of all unique words
features = feature_vector.get_feature_names()

# To get a sparse matrix of the words in the text
df_features = count_vectorizer.transform(df["lemmatized_text"])
df_sparse = pd.DataFrame(df_features.todense(), columns=features)

# Find number of times each word is seen
feature_counts = np.sum(df_sparse.values, axis=0)
feature_counts_df = pd.DataFrame(dict(features=features, counts=feature_counts))
Then split the test-train data, which use to fit to a model using Support Vector Machine algorithm.
# Data is df_features, target is df["Sentiment"]

X_train, X_test, y_train, y_test = train_test_split(df_features.toarray(),
    df["Sentiment"],
    test_size=0.3,
    random_state=69) # haha funny number amongus

nb_clf = GaussianNB()
nb_clf.fit(X_train, y_train)

svm_clf = svm.SVC()
svm_clf.fit(X_train, y_train)

nb_y_pred = nb_clf.predict(X_test)
svm_y_pred = svm_clf.predict(X_test)
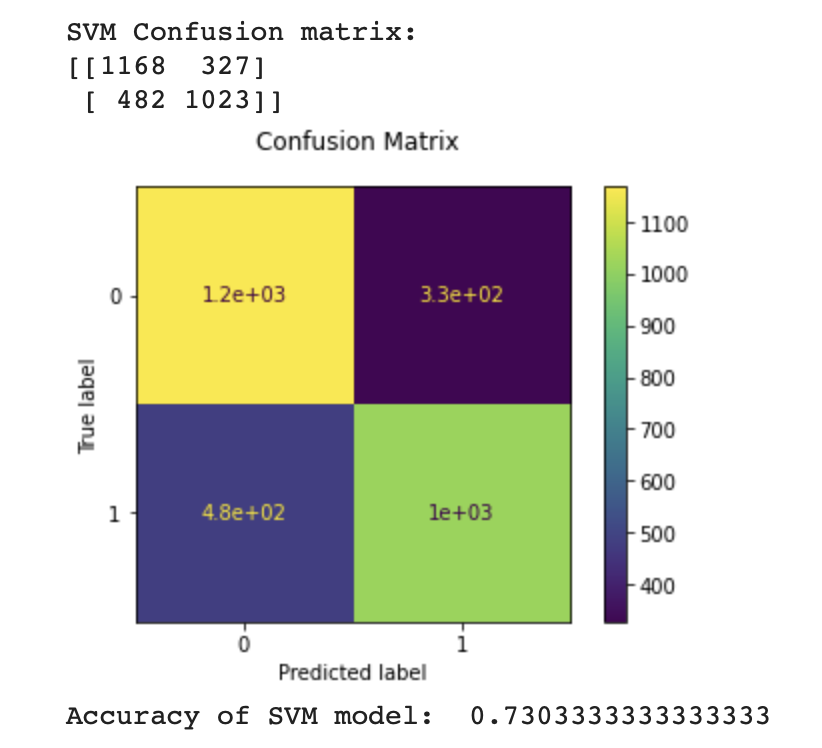
The trained model finishes training with the accuracy of 73.27%
# %%script false --no-raise-error
# Comment the line above ^ to run this cell

# Confusion Matrix
# For Guassian and SVM

disp = metrics.plot_confusion_matrix(svm_clf, X_test, y_test)
disp.figure_.suptitle("Confusion Matrix")
print(f"SVM Confusion matrix:\n{disp.confusion_matrix}")
plt.show()
print("Accuracy of SVM model: ", accuracy_score(y_test, svm_y_pred))
Exporting the Model
Exporting model is done with the library named ”Pickle”, which can export the trained scikit- learn model. In which we can use the model externally. Hence reduction in the program runtime.
svm_clf = svm. SVC ()
model = svm_clf.fit(X_train_load, _train_load)
filename = 'finalized model.sav'
pickle. dump (model, open(filename, 'wb'))
The exported model will have a file extension of “.sav” and need the Pickle library again to import it to use in the program.
model = pickle. load (open ('datas/finalized_model.sav', 'rb'))
Deployment
Frameworks are software developed and used by developers to build applications. So you don’t have to start from scratch! Using a software framework to develop applications let you
focus on the high-level functionality of the application. This is because any low-level functionality is taken care of by the framework itself.
First of all, Flask is a web framework. It provides us, developers with tools, libraries and technologies that allow us to build a web application. A web application could a blog site, web pages and it could as big as commercial website (e.g., Apple’s website). Flask allowed us to create a powerful website with many beautiful CSS effects, and Simultaneously giving access to the users with internet, an ability to interact with our program.
Encountered Problem with Flask
The picture below shows the function of toneAnalyze, which we use to integrate our model into the flask application.
import pickle
import numpy as np
import pandas as pd
from sklearn. feature_extraction. text import CountVectorizer

def toneAnalyze(sentence):
    model = pickle. load (open ('datas/finalized_model.sav', 'rb'))

    lemtext_csv = pd. read_csv("datas/lemtext_new.csv")
    lemtext = lemtext_csv.iloc[10:, 1] # Dataframe -> series

    count_vectorizer = CountVectorizer (max_features=1000, min_df=8)
    count_vectorizer.fit(lemtext.astype( 'U'))

    inp = np.array (sentence) . reshape((1, -1) )
    df_temp = count_vectorizer.transform(inp. ravel ())

    if model.predict (df temp.toarray ()) == [0.]:
        return "negative"
    else:
        return "positive"
The problem originally lies on the line 11 which is to convert the lemmatized text CSV file that we exported from our Python notebook and import it into our toneAnalyze file, into a Pandas’ Dataframe, but the problem is that when we use the data frame to “fit” our count_vectorizer, the size aren’t match and can’t be fit.
So the solution that we came up with was that we use type() on the lemmatized text in the ipynb file, and it turned out that our lemtext here should be a “series”. Therefore we call a method of the dataframe called “iloc” which can rearrange the position of the items in lemtext into a series-like position.
But we faced another problem while doing that, the changed position makes the item count exceeds the fit() function. So we have to slice off some data to make the method iloc allocate the item’s position correctly and be able to fit() the count_vectorizer.
Hence the finalized version of line 11 becomes: lemtext = lemtext_csv.iloc[10:, 1], which lemtex_csv is the imported lemmatized text dataframe, and iloc[10:, 1] denotes that we slice off the first 10 items and rearrange the data into 1 row.
The problem however, is still not fully solved, the new issue is the type of lemtext cannot be fit into count_vectorizer because of it’s data type, even know the size is correct now. So we solve this by calling another dataframe method called “.astype()”. For our specific problem, we convert lemtext into a unicode data, so that it can finally be fit into count_vectorizer. Which the conversion is shown in the line 14. And the fitting of count_vectoizer is done.
Deplo on Heroku
Heroku is a platform that enables developers to build, run and operate their application entirely on cloud.
Normally, it would take enormous amount of time and energy to get your app up and running through Heroku git. However, we found a route, an easier, time efficient route. Here’s how we did it.
First we created a “Procfile” file. A procfile file is a text file placed in the root of your application that lists the process types in an application. You use the Procfile to tell Heroku how to run various pieces of your app. The part to the left of the colon on each line is the process type; the part to the right command to run to start the process.
web: gunicorn app:app
Then on Heroku website, we create our app on the website, and named it “Intonator”.
Instead of using Heroku git deployment method, we used GitHub deployment method. This is how we managed to saved our time on deployment stage. We highly recommend to use this method instead of other methods because how time consuming other methods are.
There are not much to say after we connected our Heroku with our GitHub. We selected our branch, then enabled automatic deploys, so every time we make a new commits, our site will be updated without having to lifting fingers! Then done!
Another advantage of using Heroku is that, they have a free plan, it limits your usage to some capacity, but for prototyping, and small project, like our Intonator, where the site have only a small traffic, it is a perfect solution.
TL;DR
Intonator is an application which can indicate the tones of the receiving message, by using a machine learning model built with Scikit-learn, and trained with NLP preprocessed text datas. And finally deployed on the web using Flask as a python web framework.
The scikit-learn model that we trained uses the data which has been through the word preprocessing based on the methods of natural language processing, namely tokenization and lemmatization. The model is trained under SVM method and has an accuracy of the tone prediction of over 73%
The application is implemented in Flask, python web framework. And it is deployed using an app hosting site Heroku.
Takeaway
Check out the codes in my GitHub!